
Setting Truss Rod: Enhance Your Guitar’s Playability
Discover how setting truss rod adjustments can enhance your guitar’s playability and sound. Learn simple tips to keep your instrument comfortable for your style
magicchords.com
8/11/2025

Setting Truss Rod is a crucial step in maintaining your guitar’s comfort and sound quality. Learn how this simple adjustment can greatly improve your instrument’s playability and overall performance. When it comes to keeping your guitar comfortable to play and sounding its best, Setting Truss Rod adjustments play a vital role. The truss rod is a metal bar that runs inside your guitar’s neck, allowing for fine-tuning of its curvature.


A properly adjusted neck ensures the strings sit at the right height, making your guitar easier to play while also reducing unwanted buzzing. Whether you are a beginner or an experienced player, understanding setting truss rod is essential for maintaining your instrument’s playability. Over time, changes in humidity, temperature, and string tension can cause the neck to bow forward or backward, affecting your playing comfort and tone.
Learning the basics of setting truss rod adjustments helps you respond to these changes quickly and effectively. While small adjustments can often be done at home with the correct tools, knowing when to seek professional help is just as important to avoid damaging your guitar. By mastering this simple but impactful maintenance skill, you can ensure your instrument always plays smoothly, feels right in your hands, and delivers consistent sound for years to come.
To become a better guitarist, it’s important to balance technique practice with instrument maintenance. While working on essential guitar drills to build speed and accuracy, you should also pay attention to your guitar’s setup. Properly setting truss rod adjustments ensures your neck curvature supports comfortable playability. Combining effective practice routines with regular care will help you progress faster and enjoy a smoother, more consistent guitar-playing experience over time.


Setting Truss Rod: Understanding the Truss Rod
The truss rod, an essential component of stringed instruments, plays a pivotal role in determining a guitar's playability. Positioned within the guitar's neck, the truss rod is a slender metal rod that can be adjusted to alter the neck's curvature. Setting truss rod is an essential guitar care process. This adjustment is crucial because the tension of the strings can induce a bowing effect in the neck as they are tuned to pitch. Without a properly functioning truss rod, the guitar may suffer from issues such as excessive fret buzz, poor intonation, and uncomfortable action, diminishing the overall playing experience.
When a guitarist places their fingers on the strings, they apply force that can change the alignment of the neck. The truss rod compensates for this strain by allowing for controlled adjustments. By tightening the truss rod, the neck is straightened, which can help lower string action and provide a more comfortable experience for players. Conversely, loosening the truss rod creates a slight curve, which is often beneficial for achieving a higher string action, particularly in genres that demand a more expressive playing style, such as slide guitar.
The truss rod significantly influences intonation; any deviation from the proper neck alignment can affect the pitch of each note along the fretboard. By maintaining an appropriate curvature, the truss rod facilitates accurate notes across the entire neck, reducing the likelihood of sharp or flat notes. Thus, understanding the truss rod's mechanics and being proficient in its adjustment is essential for all guitarists who seek to enhance their instrument's playability and overall performance. Focusing on this component not only promotes a better musical experience but ensures that the guitar remains in optimal condition over time.
Signs: When setting truss rod is needed?
A well-maintained guitar is essential for optimum playability, and recognizing the signs that may indicate a need for a truss rod adjustment is crucial for every musician. One of the most common symptoms is fret buzz, where the strings unintentionally come into contact with the frets during play. This can occur due to various factors, but an improperly adjusted neck is frequently at the core of the issue. If you notice an unusual buzz when fretting notes, particularly at certain locations along the neck, it may be time to examine the truss rod settings.
Another sign that suggests the necessity for truss rod adjustment is high action. High action refers to the elevated distance between the strings and the fretboard. When the action is excessively high, playing can become cumbersome, especially for styles that require agility and speed. An adjustment to the truss rod can lower the action by addressing the neck's curvature, making your guitar more comfortable and enjoyable to play.
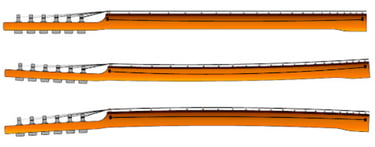
Neck bowing is yet another indicator that highlights the importance of inspecting your guitar’s truss rod. A neck that is either too convex (forward bow) or too concave (back bow) may lead to issues such as string buzzing or difficulty in playing. In order to maintain optimal string tension and alignment, a slight truss rod adjustment can correct the neck's curvature, providing a balanced performance across the fretboard.
It is advisable to regularly monitor these indicators to ensure that your guitar remains in peak condition. Awareness of the symptoms associated with truss rod issues enables players to take proactive measures in maintaining their instruments' playability. Proper maintenance, including timely adjustments like setting truss rod is vital for enjoying a consistently rewarding musical experience. So how the setting truss rod process works? Let us see.
Setting Truss Rod: A Step-by-Step Guide
Setting truss rod of your guitar can significantly improve its playability and overall performance. Before proceeding, gather the necessary tools: a truss rod wrench (specific to your guitar), a tuner, a capo, a ruler or string action gauge, and possibly a screwdriver. It is essential to ensure that your guitar strings are in good condition and adequately tuned for an accurate assessment before making adjustments.
Start by determining whether you need to tighten or loosen the truss rod. Typically, you will want to tighten the rod if the neck has too much relief, which results in higher action and difficulty playing. Conversely, if the neck is too straight or has a back bow, loosening the truss rod may be necessary. To check neck relief, press down on the first and last frets of the low E string and measure the gap at the 8th fret using your ruler. A gap of around 0.25mm is generally ideal.
Next, with the appropriate truss rod wrench, make the adjustments slowly and deliberately. If you need to tighten the rod, turn it clockwise in small increments, preferably a quarter-turn at a time. Allow the neck to settle for a few minutes before rechecking the relief measurement. If loosening is required, turn the wrench counterclockwise, following the same procedure to check the relief afterward.
Safety is paramount during this process. Be cautious not to over-tighten, as this could damage the neck or the truss rod itself. Additionally, make your adjustments gradually to avoid excessive strain on the instrument. Always keep your focus on the neck’s curvature and make necessary adjustments carefully. By understanding this process and following these steps, you can maintain your guitar's playability effectively and ensure a more enjoyable playing experience.
The Impact of Truss Rod Calibration on Playability
The calibration of a truss rod is a pivotal factor that directly influences a guitar's playability. A well-adjusted truss rod ensures that the neck maintains an appropriate curvature, which not only contributes to a more comfortable playing experience but also significantly affects the instrument's overall responsiveness. When the neck is properly shaped, players can enjoy easier access to the frets, allowing for smoother transitions between notes and chords.
One of the primary reasons for adjusting the truss rod is to regulate string action. A lower action, achieved through precise adjustments, reduces the distance between the strings and the frets, which notably improves playability. This is particularly beneficial for musicians who favor techniques such as bending and sliding, as it requires less finger pressure to execute. Conversely, an excessively high action can hinder performance, making it difficult to play complex pieces. Therefore, a truss rod that is expertly calibrated plays a crucial role in allowing for optimal string action.
The responsiveness of the guitar is enhanced with correct truss rod settings. A well-calibrated neck promotes better transfer of energy from the strings to the body of the guitar, thus impacting tone and sustain. Players are likely to notice a more vibrant sound, as the strings vibrate freely without excessive dampening caused by an improperly adjusted neck. This leads to a richer tonal palette and greater sustain, enhancing the overall musical experience. By understanding the importance of truss rod calibration, guitarists can unlock their instrument’s full potential, resulting in easier playability and improved sound dynamics.
Common Mistakes to Avoid When Setting Truss Rod
When it comes to adjusting the truss rod, many guitar players unknowingly make mistakes that can compromise their instrument's playability. Setting Truss Rod help control the curvature of the guitar neck, directly impacting string height, playability, and overall tone. One of the most frequent errors is making dramatic changes to the truss rod adjustment in one session. Players may feel tempted to crank it significantly to correct an issue quickly. However, this can lead to over-correction and unintended damage to the neck. It's advisable to make small adjustments, typically no more than a quarter turn, allowing the neck to respond gradually to these changes.
Another common mistake involves neglecting the impact of string gauge on neck adjustments. Different string gauges exert varying amounts of tension on the neck, which means that what works for one set may not hold true for another. For example, shifting from light to heavy gauge strings may necessitate a corresponding adjustment to the truss rod. Always consider the gauge of your strings and how this fits into your overall setup for optimal playability.
Failing to allow the neck to settle before re-evaluating the adjustment is yet another pitfall. After making a truss rod adjustment, it is crucial to let the neck acclimate for a period—typically 24 hours. This waiting period allows the wood to flex and settle into its new position, providing a clearer indication of whether further adjustments are necessary.
To avoid these pitfalls, take a systematic approach. Document your adjustments and observations, and develop a suitable tuning routine. Consistently checking your guitar's setup ensures that any changes remain manageable and do not inadvertently lead to more significant issues down the line. By being mindful of these common mistakes, players can ensure that their truss rod adjustments enhance their guitar's performance rather than hinder it.
Maintaining Your Guitar’s Neck Beyond Setting Truss Rod Adjustments
Over time, factors like string tension, humidity, and temperature can alter neck alignment, making setting truss rod adjustments necessary. While truss rod adjustments are crucial for achieving optimal neck relief and playability, there are additional maintenance practices that contribute to the overall health of a guitar neck. One key factor in maintaining your guitar’s neck is proper humidity control. Wood is a porous material that can easily be affected by fluctuations in humidity. Excessive dryness can lead to warping, while too much moisture can cause the neck to swell or bow. Therefore, it is advisable to store your guitar in a climate-controlled environment to minimize these risks. Using a hygrometer can help monitor humidity levels to ensure they remain within the ideal range of 40-60%.
Another fundamental aspect of guitar maintenance is regular string changes. Old or worn strings can contribute to tuning issues and may even lead to unnecessary strain on the neck. Fresh strings not only improve the sound quality but also contribute to the overall playability. It is generally recommended to change strings every few weeks or sooner if they appear discoloured or lose their tonal quality. Removing the old strings and cleaning the fretboard during this process allows you to remove grime and dirt, further enhancing the condition of the neck.
Periodic professional setup is also an important practice for maintaining your guitar’s neck. While some guitarists may prefer to handle adjustments themselves, a professional setup can provide a more comprehensive evaluation of your instrument. This includes not just truss rod adjustments but also nut height, saddle action, and intonation checks. A well-executed setup can significantly improve playability and address any underlying issues that may not be apparent during routine maintenance. By adopting these holistic approaches, you can ensure your guitar's neck remains in excellent condition, allowing for an enhanced playing experience.
Setting Truss Rod: When to Seek Professional Help
While many guitarists are capable of making minor truss rod adjustments to improve playability, there are instances where seeking professional help becomes essential. Understanding when to consult an expert can prevent damage to your instrument and ensure optimal performance. One critical situation is when extreme neck issues arise, such as significant warping or bowing. These pronounced problems can lead to playability issues that are difficult to resolve without specialized knowledge and tools. If you find that your neck has excessive relief or back-bow beyond normal adjustments, it is advisable to take your guitar to a qualified technician.
Another scenario where professional assistance is warranted is when, after making adjustments, a player still experiences discomfort or difficulty during play. If you find that the action remains uncomfortably high or the strings buzz despite your best efforts, it might be time to consult a professional. A skilled technician can provide a comprehensive setup, addressing elements such as nut height, fret leveling, and intonation issues that may be contributing factors to your playing discomfort.
Finally, if a player lacks confidence in their ability to setting truss rod correctly, opting for professional help is prudent. Truss rod adjustments can significantly impact your guitar's performance, and a misstep can result in more harm than good. Technicians possess the expertise required to navigate the nuances of various guitar models, ensuring that string tension and neck relief is balanced appropriately. In such cases, investing in a professional setup not only enhances playability but also offers peace of mind, knowing that your instrument is in capable hands. Ultimately, recognizing when to seek professional help is crucial for maintaining your guitar's health and enhancing your musical experience. By learning the basics of setting truss rod, you can maintain comfortable action, prevent buzzing, and keep your instrument sounding its best. With the right knowledge, this small adjustment can make a big difference in your guitar-playing experience.


TIP: Learning songs you love can make guitar practice more enjoyable and motivating. Working on classics like Johnny Cash Hurt Chords allows beginners to focus on simple progressions while improving rhythm and timing. By combining familiar melodies with consistent practice, you’ll build confidence and develop essential skills that carry over to other songs and styles you want to play.